 Skip to content
Before making any maintenance, repairs, or modifications to their heating system, homeowners must drain it. This entails draining all water from the pipes, radiators, and boiler to ensure that the repair is completed safely. It can be tough to finish on one’s own, but with the right tools and sufficient planning, most people can do it. This simple instruction shows you how to complete each stage.
Why You Might Need to Drain Your Heating System
There are a lot of reasons why you might need to drain your heating system. Common reasons include washing out the sludge and debris that accumulates over time, replacing the radiators, updating the boiler, and repairing pipes that are leaking. In order to prevent rusting, some homeowners drain the system before adding new inhibitor fluid. It is certain that draining your system will ensure that it can be worked on securely and properly, regardless of the reason.
Tools and Materials You’ll Need
Before you begin, make sure that you have all of the necessary tools and equipment so that you do not have to take any breaks for whatever reason. In most cases, you will require an adjustable wrench, a flathead screwdriver, a bucket or a hose, and some old rags or towels to absorb any mess that may occur. You may also require a radiator bleed key, gloves to protect your hands, and a corrosion inhibitor for the purpose of refilling at a later time. When you prepare everything ahead of time, things proceed more smoothly and with less stress.
Safety Precautions Before Starting
Whenever you are working with heating systems, you should always prioritise safety. Prior to emptying the system, it is essential to ensure that the boiler is completely turned off and that the system has cooled down sufficiently. Pouring out hot water too early can result in severe burns. In the event that you encounter any unexpected seepage, use gloves and put towels within easy reach. Be sure to let everyone in the house know as well so that no one accidentally turns the boiler back on while you are in the process of working on it.
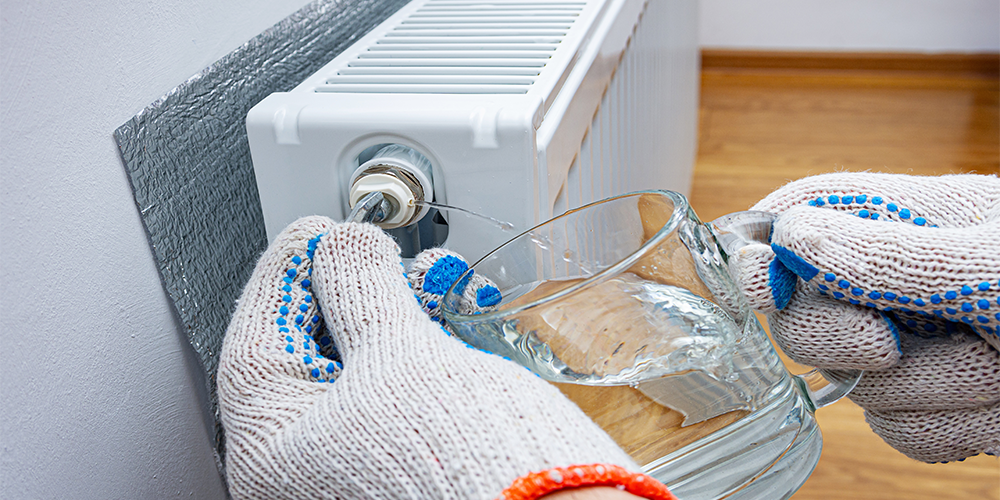
Locating the Drain Valve
In order to ensure that water can easily flow out of the system, the drain valve is typically located at the bottom of a central heating system. It is typically located around the bottom of a radiator on the first floor or along a pipe that is close to the floor near the boiler. There is a possibility that your property will have more than one drain point if it is older or larger. Make sure to check the facts before you get started. If you are unsure of where it is located, you should consult your boiler manual or ask a heating professional to save time.
Switching Off the Boiler and Power Supply
Before draining the boiler, you are obligated to totally cut off the electricity supply to the boiler. Turn it off at the main control panel and then disconnect it from the power source to avoid the possibility of it inadvertently rebooting itself. Make sure that your boiler is not going to switch off in the middle of the draining process if it has a smart thermostat or a timer. This method ensures that you will not cause any damage to the boiler and that you will be safe during the time that you are working on the system.
Shutting Off the Water Supply
Then, in order to prevent further water from entering the system while it is draining, close the water supply valve. The filling loop valve that is located close to the boiler is typically turned off by individuals in order to do this. It may also be necessary to shut off the main water supply in certain residences. After the water supply has been cut off, you won’t have to worry about the system refilling itself if you drain it.
ECO4 Scheme Eligibility
“100% Free Check – No Hidden Fees”
Step-by-Step Process to Drain the System
Step 1: Prepare and make it safe
Switch off the boiler at the programmer and the electrical isolator. Then, let at least 30-60 minutes for the system to cool before touching it. To prevent the boiler from starting again, switch off all room thermostats and timers. Put on gloves and safety glasses, set down towels or dust sheets, and let everyone in the home know what you’re doing so that no one accidentally turns anything on. If you smell gas or think there might be a leak, stop what you’re doing and call a Gas Safe engineer right away.
Step 2: Cut off the water supply
Find the filling loop, which is a braided line with two small isolating valves next to the boiler. Close both valves to block mains water from getting into the heating circuit. If your system is gravity-fed, turn off the ball valve on the loft header tank. If you can’t find either of these, turn off the main stopcock in your house. This stops the system from replenishing while you’re trying to drain it. If it doesn’t, the water will keep coming in and you’ll never empty the circuit.
Step 3: Check pressure and let extra pressure out
Check the pressure gauge on the boiler. A sealed system will normally be at 1 to 1.5 bar when it’s cold. Before you open a drain, open one radiator bleed valve (ideally on an upstairs radiator) until you hear air instead of water. This lets trapped pressure escape. Don’t ever force valves or joints. If the gauge won’t move or the pressure stays high, stop and call an engineer.
Step 4: Find drain-off points and make a design for drain
Look for the drain cock(s), which are usually at the bottom of the system, like a valve near the boiler or on a low-level radiator or pipe. Some systems feature a separate drain cock, while others use the hose union on the filling loop as the drain point. Think about where the water will go: into a big container, a floor drain, or an exterior drain nearby. Check that the hose will slope down without any kinks and that the drain can handle hot water and any trash.
Step 5: Securely attach hose and protect region
To prevent leaks, attach a garden hose to the drain cock or drain-off union and tighten it using a jubilee clip or by hand. Take the other end to the place where you throw things out. If it’s a container, make sure it’s big enough and set it on solid ground. Place clothes, trays, and buckets around the radiator bleed valves that you want to open. If there is sludge, you should expect some dirty water and drips.
Step 6: Open radiator bleed valves
Using a radiator key, open the bleed valves on the tallest radiators halfway, beginning at the top of the house. This allows air to enter the system. The air pouring in from the top helps break the vacuum and allows water to flow out at the lowest drain point. Open them slowly; all you need to do is allow in some air and a little water. Close them later when the radiators run out of water.
Step 7: Open the drain valve to start draining
Carefully open the drain cock with the hose attached and bleed the top radiators. You can do this with a spanner or by hand, depending on the kind. Start the flow by slowly opening it and looking for leaks in the hose and outlet. Watch the hose connection closely for the first minute. If it leaks, turn off the water, correct the connection, and turn it back on. Expect the water to be hot at first, and stay away from the spray.
Step 8: Start from the top and bleed each radiator one at a time
Move floor by floor from the highest radiators to the lowest. At each radiator, open the bleed valve entirely so water and air can escape into the drain. As you reach lower radiators, you’ll witness a steadier trickle of water; when a radiator runs empty and only air comes out, close that bleed and continue to the next. This practice from top to bottom speeds things up and keeps water from becoming stuck in pockets.
Step 9: Keep checking the boiler and gauge
Check the boiler pressure gauge and listen for gurgling or other strange sounds. These sounds mean that air pockets are flowing through the system. If the boiler exhibits trouble codes, shuts down, or the pressure behaves weirdly, halt and note the symptoms – you may require a specialist. If flow suddenly ceases but radiators still hold water, verify there isn’t a blocked isolation valve or kinked hose impeding drainage.
Step 10: Deal with problematic water or sludge pockets
If some radiators still hold water after draining (common when sludge or blocked pockets exist), try tipping the radiator leak slightly more open or gently swaying the radiator valves (don’t force them). For badly sludged systems you may only receive partial drainage — that’s a cue to call a heating engineer for a power flush or a targeted radiator removal. Never force unions apart under coercion.
Step 11: Finish the drain and close the drain valve (or leave open for repairs)
You can close the drain cock when you observe that only air is coming through the hose and all of the radiators are empty. If you’re preparing to do repairs, you may opt to keep radiator bleeds open to make it evident that the system is empty — otherwise, close all bleed valves tightly to prevent dirt and insects from entering the pipes. Remove the hose and wipe out all damp spots.
Step 12: Clean up, carefully dispose of leftover water, and prepare for re-fill
Collect and dispose of any foul water or sludge in accordance with local standards (many people collect it in containers and dispose of it down an external drain). Check unions and valves for damage, clean the area, and dry the fittings. If you’re done with work, take a note of where you opened items and what you changed so refilling and repressurising go easily; if you’re unclear about the next stages (refill, inhibitor, pressure reset), call a plumber.
Checking If the System Is Fully Drained
To ensure that the system is completely devoid of liquid, the radiator bleed valves must be opened. If water continues to flow, you should check again. The system has been entirely drained of water if just air escapes and none of it drips out of the radiators. You should also inspect the drain hose. When the water stops running and remains dry for a few minutes, the procedure is said to be complete. You can also verify the presence of trapped pockets of water by listening for any gurgling or leaking sounds that may be coming from the pipes.
Refilling the Central Heating System
Be certain to close the drain valve and all of the radiator bleed valves before refilling once more. Reopen the filling loop so that fresh water can seep into the system. Make sure that the pressure gauge on your boiler is functioning properly and that you turn off the water supply as soon as the pressure reaches the appropriate level, which is often between 1 and 1.5 bar. You should check for any leaks while you are in the process of refuelling.
Adding an Inhibitor for System Protection
A substance that prevents the accumulation of rust and sludge in your pipes and radiators is referred to as a heating system inhibitor. It ought to be added every time the system is refilled following a drain. In order to add the inhibitor directly into a radiator, you will need to use a funnel or injector apparatus. In the future, your system will require less maintenance and perform more efficiently if you take this small step.
Common Mistakes to Avoid
- Not shutting off the boiler and allowing it to cool before draining it may result in burns or system damage.
- If you empty the system while it is still filling, it will remain full.
- Failure to open the bleed valves stops radiator water from draining.
- Refilling without an inhibitor allowed rust and filth to enter.
- Tightening valves excessively can damage fittings and create leaks.
- Because the operator was in a rush, he overfilled without first checking for leaks, resulting in concealed water damage.
- Attempting to drain complex or pressurised systems without training may result in costly mistakes.
When to Call a Professional Plumber
Although it is possible to drain a system on your own, there are certain situations in which it is better to employ a plumber. Hire a professional if you’re not comfortable working on your heating system, if it’s under pressure, or if you find the task too difficult. Also, experts can do a total system power flush, which works better than a simple drain.
FAQs
Should I empty my central heating system often?
Your heating system doesn’t need regular emptying. Usually only needed for repairs, replacements, or sludge removal. Routine draining can sometimes be harmful.
Should I drain my heating system myself or hire a plumber?
An experienced DIYer with the right equipment and safety precautions can drain most systems. Contact an experienced heating specialist if your system is complex, under pressure, or uncertain.
How long does the heating system take to empty?
Depending on the size of your home, radiator count, and system sludge, the process takes 30 minutes to 2 hours.
Should system replenishment include an inhibitor?
Yes. The inhibitor inhibits rust, scale, and sludge in your heating system. Without it after refilling, your boiler and radiators may not work or last as long.
If water keeps spilling after closing the drain valve, what should I do?
Water flowing may indicate that the filling loop or main supply is not closed. Close the double-check valves entirely. If the problem persists, get help to avoid further injury.


